Motivation
It's useful to run code somewhere other than a laptop or phone. An obvious use case is hosting a big AI model in a temporary environment, but could also be multi-user software like SaaS, or giving friends and family access to tools over the internet.
My personal requirements fall into two themes:
- Use servers rather than PaaS solutions. I'm spinning up different-sized machines and applications and prefer the flexibility of the Linux virtual private server (VPS) approach over working in a single Cloud platform.
- Note: when people describe a tech stack, they do not always clearly separate the application layers (e.g. frontend technologies like React, backend technologies like SQL) from the deployment layers (e.g. VM providers like Hetzner, or platforms like Heroku, Vercel, Firebase, Coolify, Supabase, etc.), and there are a plethora of options. Of course, other factors (like type of app or familiarity with certain technologies) definitely lead to differing opinions on which paradigm is best.
- Ensure that the servers are secure. Especially for public-facing apps, it's important to control access, prevent data leakage, and monitor the system.
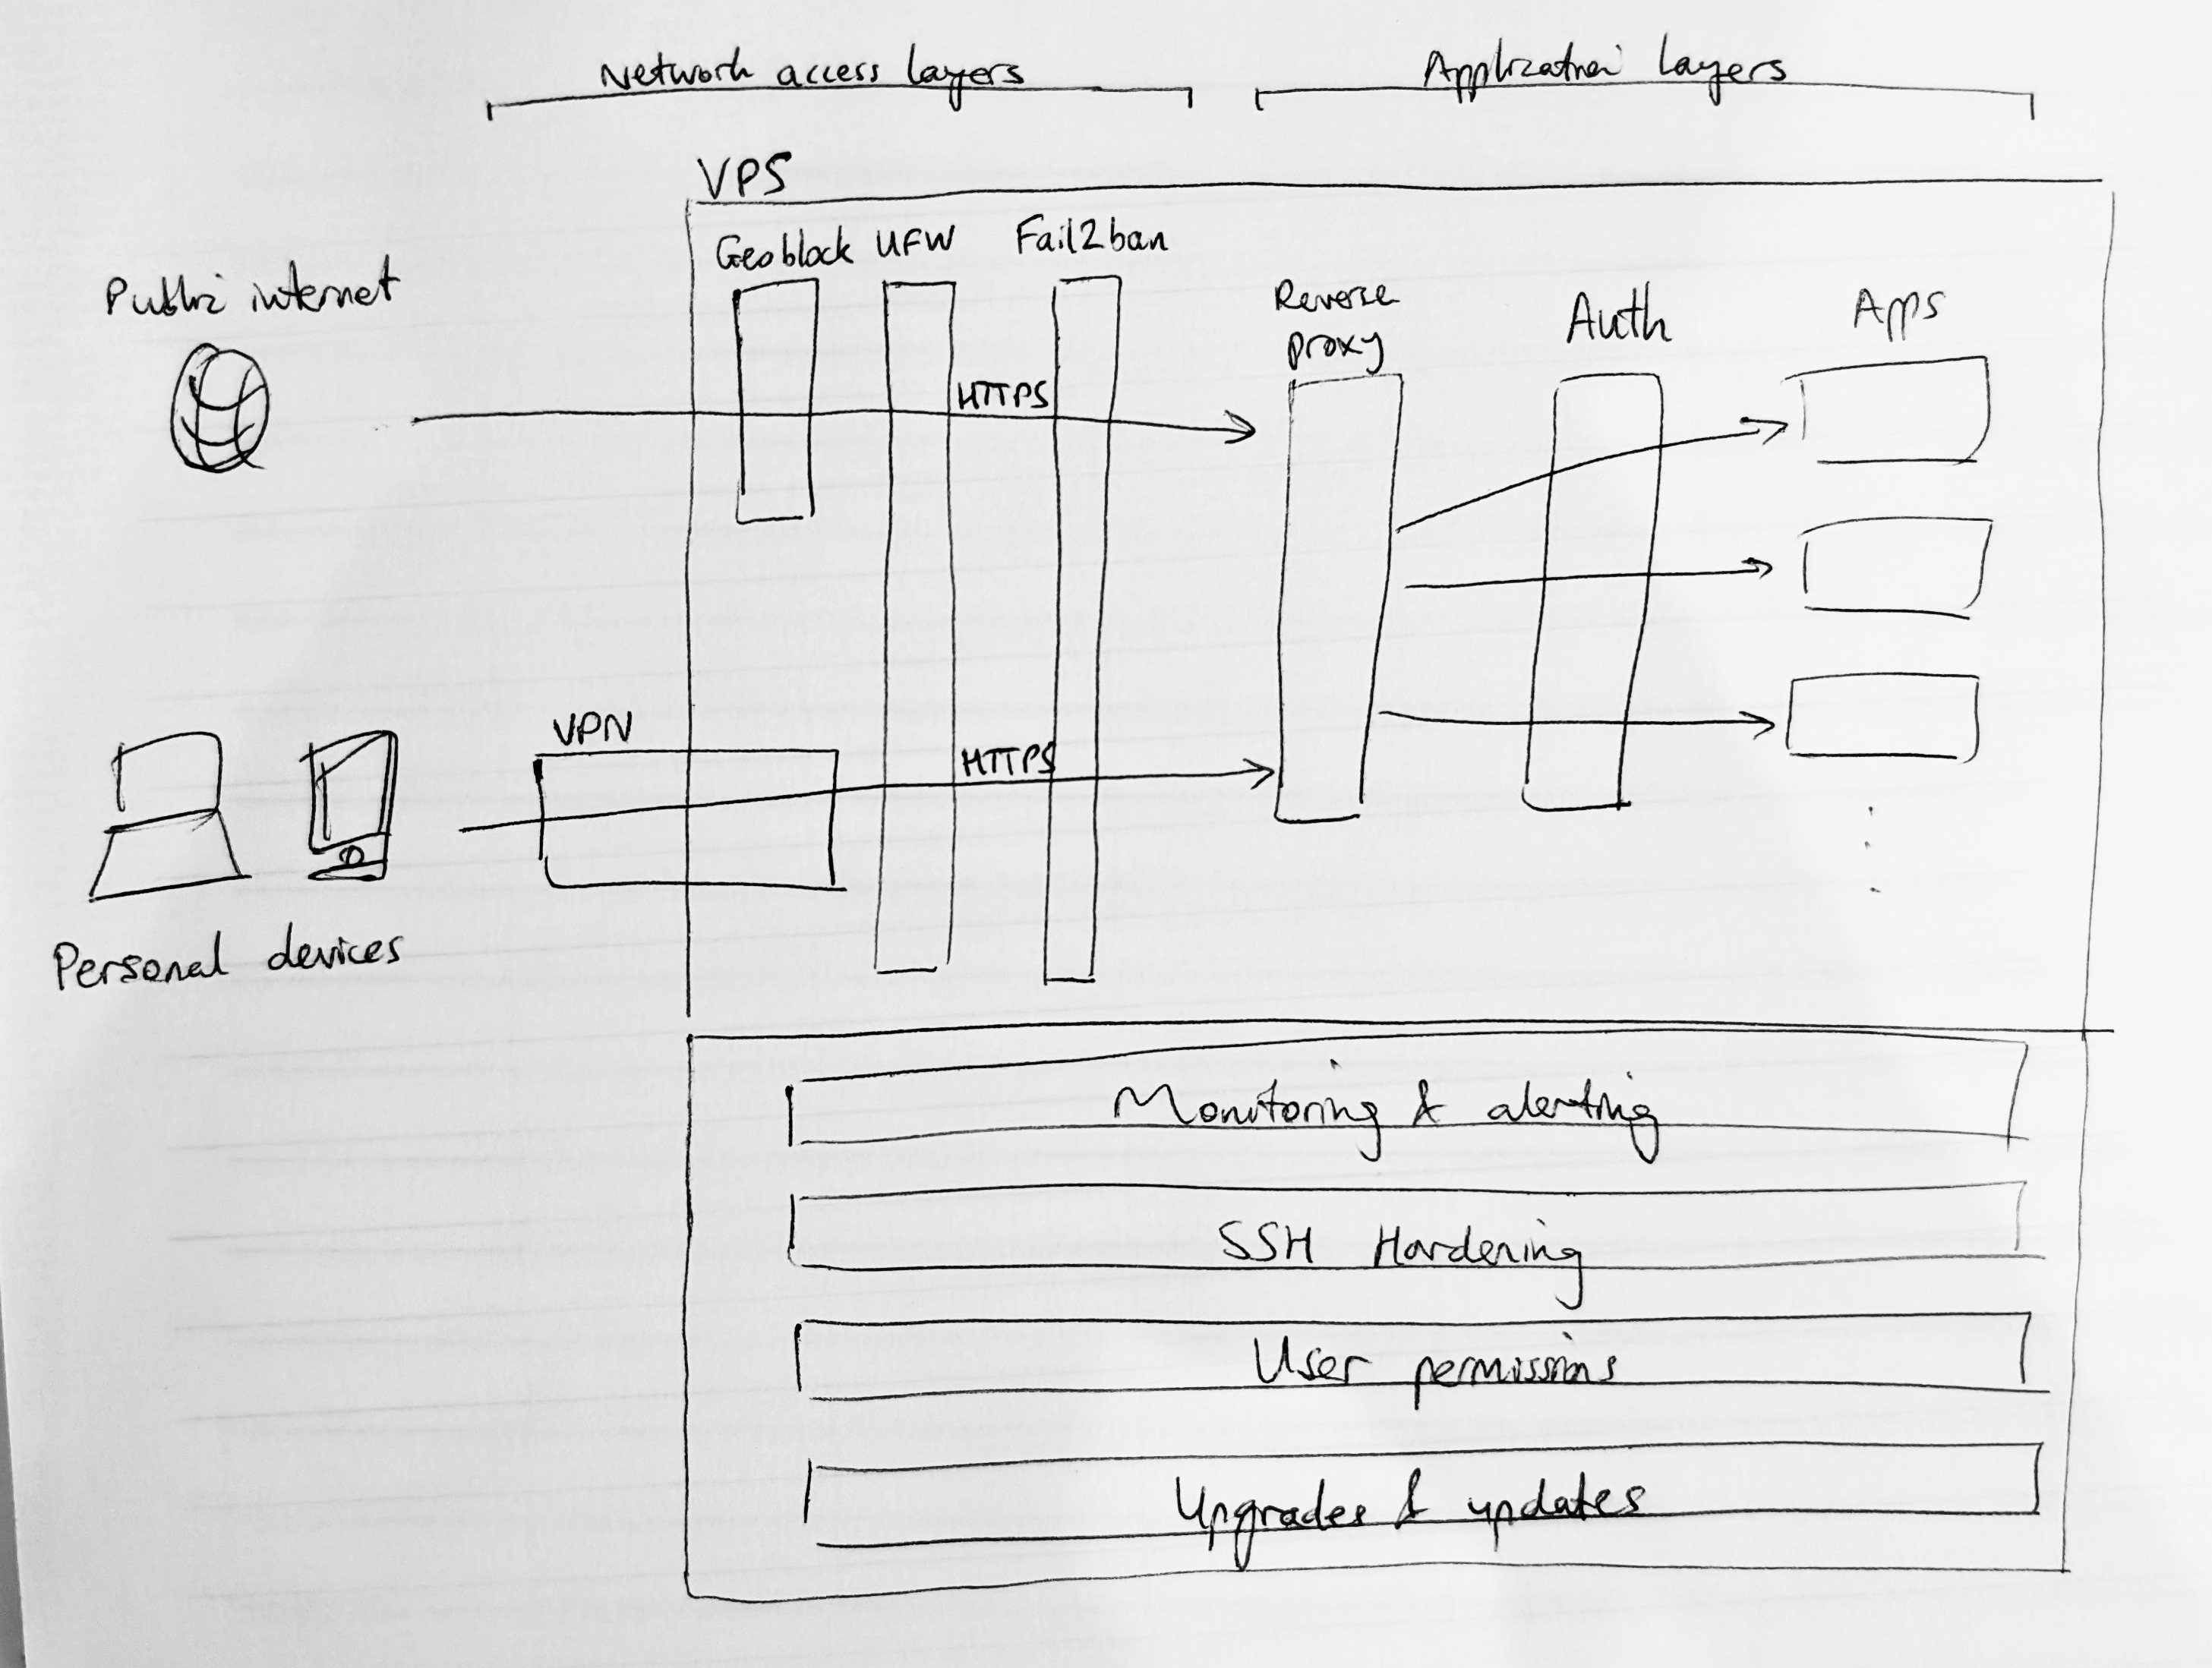
My virtual private server (VPS) management methodology includes a multi-layered security model suited for running arbitrary applications and managing who can access them over the internet, and in this post I'll explain a bit about how it all works. I've aimed to write this article to illustrate the thought processes behind this. The overall goal is to provide a consolidated overview of security features, supplemented by commentary on when and how to implement them.
There are multiple VPS setup scripts out there. Developing my own gave me deeper technical understanding and represents an evolution in my knowledge from when I wrote about static site development (touching upon related concepts like fail2ban and HTTPS) in 2022.
Disclaimer: DYOR on security and how to set it up properly.
Overview: Multi-layered security model
The way to think about VPS security is to imagine placing multiple filters in front of incoming traffic. You should assume (because it's true) that there is a constant stream of global bot traffic trying to sniff out vulnerabilities in your server, and respond accordingly. You should also configure the server to minimise the damage that an attacker could possibly do.
This involves:
- layering filters to restrict which traffic can hit the server (e.g. blocking certain IPs)
- adding authentication at the app layer so that any traffic reaching the server needs to login to go any further
- making configuration changes to restrict login/SSH privileges (e.g. disabling root SSH)
- collecting logs and alerting on suspicious behaviour
- keeping the server up-to-date with security patches
There are some relatively off-the-shelf options for setting up multiple security features but, as mentioned, I wanted to go the DIY route.
The above concepts would generally apply to any server where services are exposed to the internet. To meet my additional requirements, I'll also be adding:
- a reverse proxy, which routes traffic between multiple destination services (i.e. different apps) once it reaches the application layer inside the server
- a VPN, which acts as an additional external boundary layer that traffic needs to pass if it wants to reach the server (this obviously restricts how many individuals/devices are actually able to hit the server; it lets us easily do some really cool private use cases but wouldn't be appropriate for a public SaaS scenario)
As we proceed, I'll also make some relatively uncontroversial choices about specific technologies to use, such as Flask for building the apps and Docker for managing them.
Setting up a new server
Of course the first step is to spin up a new Linux VPS and SSH in. It's good practice to switch to a non-root user ASAP. I would also install some basic packages: sudo apt update && sudo apt install -y curl git unzip htop.
SSH hardening
SSH is already quite secure but we can make it even better with changes such as (do sudo nano /etc/ssh/sshd_config):
- change
#PermitRootLogin yestoPermitRootLogin noto disallow any root-level SSH - change
#PasswordAuthentication yestoPasswordAuthentication noto ensure SSH is using keys not passwords
You can also consider changing the SSH port - but some people say to just keep it on standard port 22.
Refresh with sudo sshd -t && sudo systemctl restart ssh.
Access layers: VPN, firewall, geoblocking, brute force blocking
We can now really start working on the access filter layers of our security model.
Set up a Virtual Private Network (VPN)
A VPN creates a secure, encrypted tunnel between a user's device and the server. From the server's perspective, the user traffic looks to be coming from the VPN (rather than their original IP address) - so the server can be configured to restrict access to VPN members only.
To get onto the VPN in the first place, the user typically has to download and install a dedicated VPN client (i.e. an app which requires a secure sign-in). This makes it a very secure layer, but does add friction which makes a VPN quite unsuitable if you want public or semi-public access to be possible.
There is a range of VPN options available.

Firewall (UFW)
Deciding to manage apps on a VPS relies on some knowledge of ports. I like to think of a port as an abstraction - it's just a number which can be used by whatever software is handling the networking. More specifically, running applications can be placed on ports (i.e. labelled with a port number) and then incoming connections can be aimed at different applications when they also request the same port number (you see this as ipaddress:port).
There are some defaults which are commonly observed in port numbering: most importantly that SSH, HTTP and HTTPS traffic request connections to ports 22, 80 and 443 respectively.
Ports therefore represent an attack surface on a VPS. You might be running software that listens for connections on different ports, and need to control who can access each one.
The simplest way to manage port access is with Uncomplicated Firewall (UFW). It is straightforward to add rules for allowing or denying traffic to different ports. As an example:
sudo ufw enablesudo ufw default deny incoming(block all incoming traffic)sudo ufw allow 22/tcp(allow any traffic to reach port 22 - e.g. for attempting SSH)sudo ufw allow in on wg0(allow Wireguard VPN traffic to reach any port - nb.wg0is a shortcut for Wireguard's network interface)sudo ufw reload
We will see in the reverse proxy section that it's better to restrict all web traffic to HTTP and HTTPS ports and to later route them to applications listening on internal ports (rather than exposing application ports directly to the internet). So generally speaking UFW should lock down all ports apart from 22, 80 and 443, with optional restrictions to VPN traffic only.
Geoblocking
We can also filter incoming traffic by IP address and use the firewall to block/allow certain countries (e.g. whitelist only your own country). This involves getting a list of IPs by country from a third party, then using that to drive firewall rules (either in UFW or iptables).
You can also add a whitelist exception to VPN IP ranges to avoid them getting accidentally geoblocked, by adding something like -A geoip -s <ip-range-here> -j ACCEPT to /etc/ufw/before.rules.
Alternatively, it's possible to use the same IP database but implement the blocking as a module in the reverse proxy layer.
Brute force blocking (Fail2ban)
Another layer of protection is Fail2ban which watches for suspicious behaviour (like repeated, failed access attempts) and bans (or 'jails') those IPs. This is straightforward to setup.
You can check the status of banned IPs with sudo fail2ban-client status (which shows the list of 'jails') and sudo fail2ban-client status <jail> to see the IPs .
Sometimes you might accidentally ban yourself (e.g. if you use the wrong SSH key). In this scenario, you might have to log in to the VPS through your provider's recovery console and do sudo fail2ban-client set <jail> unbanip <ip>.
Application layers: reverse proxy, HTTPS, authentication
Reverse proxy
We're now through the majority of the network access layers and (good) traffic reaches the application boundary. We need a method to route incoming traffic between different applications.
A reverse proxy is a popular, well-documented pattern that fits this use case. Alternative approaches (e.g. ngrok, Cloudflare Tunnels) are analogous to SSH and VPN in that they open secure tunnels between the server and a client entrypoint, but they start to diverge from my original key requirements.
Once again, there are lots of different reverse proxy technologies to choose between. The main options include nginx (and/or Nginx Proxy Manager), Apache, Caddy, Traefik and Pangolin; with the main differences being around ease of configuration, completeness of documentation, and ease of integration (with authentication services and Docker).
I had some prior experience working with Apache (as part of the LAMP stack) in a previous WordPress setup but was finding more documentation and discussion about nginx, so decided to switch to using that. Really any option would work, but I've enjoyed the barebones and customisable nature of nginx - and it's easy to install (note: you can also run it inside a Docker container).
Some hardening steps to consider include:
- Disabling the default site (
sudo rm /etc/nginx/sites-enabled/default) and managing the reverse proxy as a single 'site' (also known as a virtual host)sudo nano /etc/nginx/sites-available/reverse-proxy(add config like below) then enable withsudo ln -s /etc/nginx/sites-available/reverse-proxy /etc/nginx/sites-enabled/. - Stopping nginx broadcasting its software version on error 301 redirect pages:
sudo nano /etc/nginx/nginx.confand add (uncomment the existing line)server_tokens off;.
Basic config looks something like this (in this example routing incoming (public) traffic from port 80 between apps on internal ports 5000 and 5001):
server {
    listen your.server.ip.address:80;
    server_name _;

    location /app1 {
        proxy_pass http://localhost:5000;
        include snippets/proxy-params.conf;
    }

    location /app2 {
        proxy_pass http://localhost:5001;
        include snippets/proxy-params.conf;
    }

}
where, to avoid repetition, proxy config is factorised out into a snippet at /etc/nginx/snippets/proxy-params.conf:
proxy_http_version 1.1;
proxy_set_header Connection "";
proxy_set_header Host $host;
proxy_set_header X-Real-IP $remote_addr;
proxy_set_header X-Forwarded-For $proxy_add_x_forwarded_for;
proxy_set_header X-Forwarded-Proto $scheme;
After making config changes, do sudo nginx -t && sudo systemctl restart nginx (if you only sudo systemctl reload nginx then networking changes don't always take effect!).
If we want nginx to only respond to connections on a VPN IP, then instead of listening on the public server IP address, you would listen 10.x.y.z:80 where 10.x.y.z is the static IP assigned to the server in the configuration of the VPN.
HTTPS
Not technically an application layer concept, but covered here because it enables authentication (because otherwise credentials get transmitted in unencrypted plaintext): the next layer of security is encryption (TLS) of the requests and responses between incoming clients and your application(s). There are a few ways to do this, the most common being HTTP-01 challenges via Certbot/Let's Encrypt, which basically:
- place a token at
/.well-known/acme-challenge/on the server - validate the existence of that token through HTTP on port 80, proving that you have control of the files on your machine
- generate certificates confirming this, which are what a browser looks for to enable HTTPS
An alternative approach (e.g. if port 80 is blocked or the server has to be fully locked down to VPN access only) is DNS-01 challenges.
Typically this point is where the VPS would be given a domain name (which is why I've switched to use example.com). This is as simple as creating an 'A record' (which points domain name to server IP) at the domain name registrar.
So instead of sending port 80 (HTTP) traffic to app1 and app2, we should actually change it to only route for the Certbot challenge. All other HTTP requests will get redirected to HTTPS on port 443 (which won't be valid yet) and receive a 301 response code:
# HTTP server: handles ACME challenge + redirects everything to HTTPS
server {
    listen 80;
    server_name example.com;

    location /.well-known/acme-challenge/ {
        root /var/www/certbot;
        allow all;
    }

    location / {
        return 301 https://$host$request_uri;
    }
}
Then we can run Certbot (may need to temporarily allow port 80 if you blocked it in UFW):
sudo snap install --classic certbot
sudo ln -s /snap/bin/certbot /usr/bin/certbot
sudo mkdir -p /var/www/certbot/.well-known/acme-challenge
sudo chown -R www-data:www-data /var/www/certbot #www-data is the default user group for nginx
sudo certbot certonly --webroot -w /var/www/certbot -d example.com
sudo certbot certificates  #validate results
This should have created certificates, so we can add our app routing into nginx config and supply the certificates to enable valid HTTPS:
# HTTPS server for example.com
server {
    listen 443 ssl;
    add_header Strict-Transport-Security "max-age=63072000; includeSubDomains" always;
    server_name example.com;

    ssl_certificate /etc/letsencrypt/live/example.com/fullchain.pem;
    ssl_certificate_key /etc/letsencrypt/live/example.com/privkey.pem;
    ssl_protocols TLSv1.2 TLSv1.3;
    ssl_prefer_server_ciphers on;

    location /app1 {
        proxy_pass http://localhost:5000;
        include snippets/proxy-params.conf;
    }

    location /app2 {
        proxy_pass http://localhost:5001;
        include snippets/proxy-params.conf;
    }
}
Authentication
Traffic is now securely hitting our apps, but we can add another important layer by requiring users to authenticate. Authentication basically lets us decide what to show an app user - informing either which data is visible, or whether to show the app at all.
The simplest authentication implementation is Basic Authentication which is just a username and password. Credentials can be created as follows:
sudo apt-get install apache2-utils
sudo mkdir -p /etc/nginx/auth
sudo chown root:root /etc/nginx/auth
sudo chmod 755 /etc/nginx/auth
sudo htpasswd -c /etc/nginx/auth/.htpasswd <username>
sudo chown root:www-data /etc/nginx/auth/.htpasswd
sudo chmod 640 /etc/nginx/auth/.htpasswd
and added to nginx config in the relevant server block:
server {
    listen 443 ssl;
    server_name example.com;

    ... # other config already exists here e.g. ssl_certificate

    auth_basic "Restricted Access";
    auth_basic_user_file /etc/nginx/auth/.htpasswd;

    ...
}
Notes:
- you can disable basic auth in a location block by adding auth_basic off; (e.g. for location /favicon.ico)
- you can supply basic auth credentials from command line with curl -u "username":"password" https://example.com
Authentication can be handled by more advanced services like Authelia, Authentik or others, providing an SSO-like experience that is more slick than basic auth.
Authentication can also be applied at the app level where user-specific state is required, typically with an implementation of JSON Web Tokens (JWT) that could integrate with OAuth providers for SSO. Some apps will implement this for you, but in custom apps you may decide to roll your own auth.
🎉 We now have traffic being filtered and authenticated users able to access the right services! Of course, the applications themselves also need to be running with secure production-ready configuration.
Management and monitoring
It's important to maintain the server to ensure that it remains secure. Best practices include:
- regularly installing updates especially security patches, which can be done automatically
- monitoring and alerting in the case of any suspicious activity
There are various behaviours which should be monitored, pushing notification alerts when needed, including:
- Suspicious SSH logins (it's also quite common to use PAM to alert on SSH login)
- Suspicious
sudousage - Spikes/drops in fail2ban
- Spikes/drops in geoblocking
- Disk usage
- Unexpected processes
- Docker container health
- Open ports
- Reverse proxy access and response codes per route
- Authentication attempts/success/failures
- Application logs analysis
Notifications could be pushed by tools like ntfy.sh, a Discord/Telegram bot, or even email.
Conclusion
A custom setup like this is not for everyone, and it can create opportunities for things to go wrong due to oversight or misconfiguration, as well as being overkill for certain use cases. But it also creates a nice re-usable infrastructure that can power a variety of use cases ranging from solo projects to public-facing products, as well as giving insight into the internals of the VPS to allow for fine-grained control. This VPS is now well-prepared for deploying code securely into the wild.
Note: I'm looking at a hybrid model with self-hosted PaaS with a similar security approach for future deployments.